


 christmas

Are you looking for lighting setup ideas that can create beautiful dramatic portraits? Today’s video will show you 5 distinct portrait lighting setups that every photographer can do, by using only 1 speedlight and reflective umbrella, but can give you nice dramatic portraits.
Want to level up your portrait photograpy lighting RIGHT NOW? Follow this 5 Portrait Lighting Setups tutorial, you will find how this can be so simple and effective to help your create distinct, beautiful portrait lighting in just SECONDS.
Jiggie Alejandrino, the portrait & wedding photographer we introduced before, brings about new lighting tutorial this week. He’s the Sony Ph Brand Ambassador, the Zeiss Camera Lens Ambassador, and regarded as one of the most reputable lighting specialists.
Today Jiggie’s going to go through & demo this 5 distinct Portrait Lighting Setups for different types of portraits, using just one speedlite and a reflective umbrella. So firstly, build up a Flash Unit: Speedlight+Reflective Umbrella.

Second, the Basic Settings of your camera:
- Lens: Sony 24-70 2.8GM
- Trigger: Sony Wireless Radio Commander ( to remotely control the flash unit )
- Shooting Mode: Manual mode;
- Shutter Speed: 1 /250
- Aperture: f/2.8
- ISO: 100
- Flash Power: Depends on every single lighting setup
Then let’s move on to the 5 Portrait Lighting Setups:
Portrait Lighting Setup No.1: The first portrait lighting setup is one of the most popular fine art lighting setup, which can create a clean & classic portrait.
You need:
Set the Flash Unit (assembled) on the right of your subject;
Add a reflector on the left of your subject, an ordinary foam board;
Position the Flash Unit, to throw a lot of light away from the subject, so when it hits this foam board, it will actually open up the shadows on the left side of your subject’s face.
In summary, all you need is having your light feathered away from your subject, so that most of the spell light will be going towards this general direction (the foam board), and put a foam board to open up the shadows behind your subject.
Portrait Lighting Setup No.2: Transfer the Flash Unit in the back, and the light will come from behind the shooter.
This light will give the effect of a of a ring light, which actually gives a beautiful light to a person's face. But one thing you need to consider about ring lights is the fact that it catches light in the eye, which can be unpleasing. With this particular lighting setup, you can actually get the effect of the ring light without having those weird catch eyes in the eye.

In summary, all you need is having the Flash Unit (reflective umbrella) behind you, flooding light towards the subject. The key with this setup is that you have to have your subject near the background, in order to get that really nice glow in this nice haloing around your subject.
Portrait Lighting Setup No.3: Press the grip of the Flash Unit, tilt it, so that it's almost horizontal to the floor. Then you can bring the light up, and do overhead lighting.
The key with overhead lighting is that you have to understand where your light is, then direct model or your subject and tell them: “Hey, the light is up coming from above, you should be facing towards the light.” If you don’t do this, you're gonna get really unpleasing shadows underneath the eyes and underneat chin.
Such as the following case:

“You can notice all the shadows underneath her face, and I think we're slightly underexposed, so i'll probably bring up the power to 1/4 power. There so if she looks up you could already, see she's getting a lot of light in her face, and we're removing all those unpleasing shadows around her eyes.”

In summary, one thing that you have to remember about a really nice overhead dramatic light, is to always make your subject face towards the light, in order for you not to get those really ugly shadows underneath her eyes and her chin.
Portrait Lighting Setup No.4: Use the Flash Unit as your background, and create a really nice high key portrait.
What you subject shoud do next is right in front of the flash, and you won't see it in your camera. Then bring out the foam board and use it as reflectors. Basically what's happening next is that all the light is spilling away from your subject towards the lens. Capture with these reflectors, and it's going to bounce back towards your subject’s face, creating a nice simple high key portrait.

In summary, have your flash in the back, illuminating creating that nice white background, all the light will spill on this foam board, just bounced back and that's where you based your exposure from.
Portrait Lighting Setup No.5: Put a foam board over the umbrella, which can basically block out the light, and it will create a low-key photography.
The key here is having the light or the foam board slightly above your subject’s head, so that all this light in the side will create a nice rim.

And the final tweaking to this setup is, you can even add another foam board, just to light up a bit more of your subject’s face.

And these are the 5 portrait lighting setups by using just a speedlight and a reflective umbrella. And i actually made this 5 videos already explaining every single light setup in details:
Layout #1 How to Create and Light a Fine Art PORTRAIT.
Layout #2 Light From Behind the Shooter
Layout #3 Overhead Lighting
Layout #4 High Key
Layout #5 Dramatic Photo
With this step-by-step tutorial, you will see, every photographer can create unique beautiful portrait lighting. You only need 1 speedlite & reflective umbrella, follow the guide and try each lighting setup, unique & beautiful studio lighting for portrait photography can be easy.
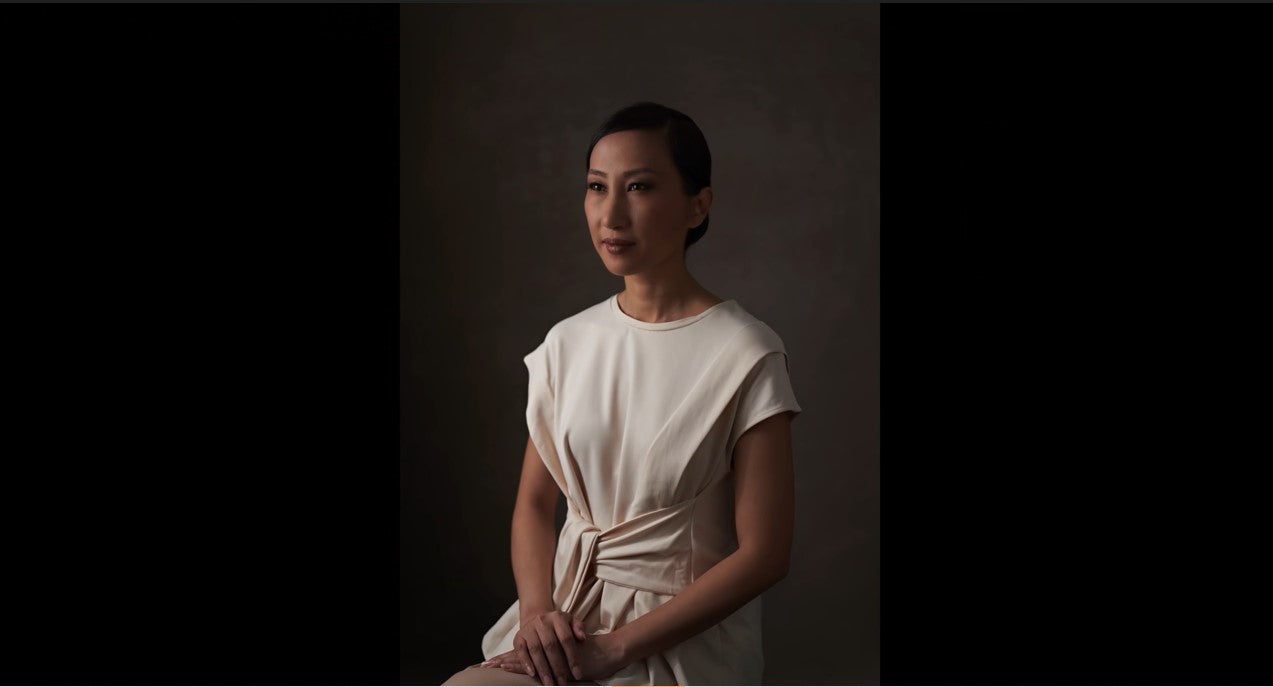
Regarding the backdrops, Jiggie chose a 5x7ft Kate Abstract Texture Dark Brown Color Hand-painted Canvas Backdrop, which is completely well qualified for the job.
For More Inspirations:
Kate 2021 Mother's Day Backdrops Collection
Kate 2021 Spring Backdrops Collection
Read More Resources: Handbook of Photography Backdrop
This is an exercise that you can do with basic equipments & studio space, and of course, you also need a fantastic hand-painted backdrop. Hope you can enjoy this video, and get some inspirations on lighting your own portrait photography.
Equipment used:
Backdrop: Kate Backdrop: https://bit.ly/3ab7fiP
Camera: Sony A7R MarkIV - https://amzn.to/2TXhv78
Lens: Sony Zeiss 50mm 1.4 - https://amzn.to/3clvI3S
Flash: Sony F60RM - https://amzn.to/36VsaUW
Trigger: Sony Wireless Radio Commander (FA-WRC1M) - https://amzn.to/3do6dAb
Modifier: Phottix 120CM Flash Holder: MagMod MagShoe: https://amzn.to/36LqZHI
Wifi Transmitter: https://amzn.to/2LCIIuV
Phottix Premio Diffuser for Reflective Umbrella: https://amzn.to/3j1kTsJ
Phottix Premio 120cm Reflective Umbrella: https://amzn.to/3aiKA42
Wifi Transmitter: Hollyland Mars300Pro: https://amzn.to/3r9w8lT
About The Photographer: Jiggie Alejandrino is a portrait and wedding photographer from the Philippines. He’s the Sony Ph Brand Ambassador, the Zeiss Camera Lens Ambassador, the International Phottix Pro Teamer, and the MagMod Philippines Brand Ambassador. He's and considered to be one of the most reputable lighting specialists in the Philippines, conducting workshops nationwide and have been featured in various photography magazines. I was also a multi-awarded portrait and advertising photographer.
Learn More:Youtube Channel ; jiggiealejandrino.com
If you like this article, please share it! Be sure to join our FB Group: https://www.facebook.com/groups/KatebackdropsEur/. to share your ideas! You can also receive free articles, updates as well as discounts information from https://www.katebackdrop.co.uk/ and our FB Group.